Thursday, January 2, 2014

Cookin' in the Kitchn'


The kitchen. These days it seems that I spend most of my time in there. With a husband and two children, everyone eats something different for some meals. The infant meal is different than the toddler meal. Hubby has lunch at work. At least 3 out of 4 of us eat the same dinner!


My lunch "sandwich" in the pan. The other two pots are for dinner. Then we have some pineapple muffins for my toddler.  

 So, as you can imagine, I do a lot of cooking. It's a good thing I enjoy it!
The sandwich recipe is one of my all time favorites. You can find the recipe here, at the epicurious website. I just switched out turkey for chicken. 
For dinner we had mensef. After trying a few recipes, mensef really is not that difficult to make!

Ingredients:

2 cups mensef soup starter
1/2 bag mensef bread
1 package lamb chops
1 onion
Handful dried bay leaves
2 cups rice
Pine nuts and almonds


Directions:
  • Layer lamb chops in pot, cover with water and add onion. Add bay leaves and simmer until tender (around 1 hour)
  • In a different pot place the soup starter on medium heat. Continue stirring until boil. Add meat broth (all) and stir until boiled. Add meat and simmer.
  • In a different pot cook rice.
  • In pan melt 2 tablespoons of butter and brown nuts.
  • In large flat dish lay mensef bread. Layer rice on top. Layer meat on rice and drizzle some yogurt sauce on top. Top with nuts.
  • In separate bowl place extra yogurt sauce.   

It's really tasty, but one of those dishes that I only like to make once a month. Hey, I try to be somewhat healthy! :-)

Give these dishes a try and let me know how it went!


Monday, June 11, 2012

Graduation Cake

It's graduation time! Congratulations to all of our 2012 graduates! 
On behalf of all of the graduates out there...here's a cake to you! (with a side of cupcakes ;-) 

This is a 'copy cake' of the publix version. At least tried to! 


As you see below, the cake was not too high. Therefore, I make another cake to top it off.
Before stacking the cakes, you want to level the top off by cutting that 'hump' off the top of each cake.


Then you want to add your 'dam' (that lovely circle of frosting around the outer edge of the cake)  with a tip #12 and fill it with either frosting or a filling. I just used frosting for this particular cake. After it's filled, place the second cake on top, evenly, and you're set!


(Picture of the top of the cake)


Take your butter cream, thin it out with a little milk, and frost that cake! I start at the top, then do the sides. 
Let it sit while you do the cupcakes. 


Baked cupcakes!


Take your butter cream and 1M (wilton) tip. Start from the the outside of the cupcake and swirl to the center.


You do not want to keep the tip on the cupcake! Raise it up, so you can a higher mountain of icing. 


I learned the hard way, but I think it's better to put the paper on first, then ice the cupcakes. lol

I also added silver and gold sprinkles on here to go along with the theme. 


Back to the cake! 
From top to bottom:
  • Use tip #3 for the top loops (You may want to mark your spacing with a toothpick for accuracy)
  • Tip #3 for the black and white dots on the side
  • Tip #3 for the side loops
  • Tip #12 for the beaded border 


Add the plastic toppers and you have yourself a graduation cake! 


Until Next Time, Happy Baking!

Friday, May 25, 2012

School Cake

My next project was for the weatherman that was visiting the school that I used to work at. 
I managed to fit the school name and a 'weather symbol' (partly cloudy) on the top of the cake.


This particular cake was a white cake with an orange jam filling to give it a slightly citrusy taste. 
I chose to color the butter cream blue to give it an illusion of the sky.
*It's usually easier to frost the cake while it's on a turn table!*


I like having an outline to work with, so I used the same gel outline as before to do the sun and cloud. Used tip #18 and did mini-stars to fill them in.


For the writing, it was a little trickier because you have to trace the letters backwards! 
I chose to use clear gel on the outline as well as the letters so you do not see it on the cake. 
Then I did the squiggly tree with the standing leaves (LOVE making leaves!!)....


I thought of using tip #12 to do a cloud like border to fit the theme


Did the same concept as with the Elmo cake...


Using tip #12 did more clouds around the outside and there it is!


Finished project :)


Until Next Time, Happy Baking!

Thursday, May 24, 2012

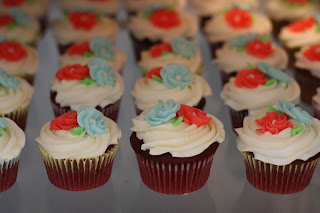
Flower Cupcakes

Cupcakes. My new love. 


The above cupcakes are quite easy to make. I wanted the flowers to be separate pieces, so I made those three days ahead so they were nice and hard.  


I used the same butter cream recipe as I did for Elmo, for these pinwheel or swirled flowers.
Using tip # 2D, keep your bag straight (90 degree angle), lightly touching the surface, squeeze lightly and turn a fourth of a turn while squeezing. Stop squeezing then lift away.  Use tip #3 to make the dot in the center. 
Do this on a piece of wax paper and place in the fridge for at least 24 hours for it to harden. 

Starting from the outside of the cupcake, with tip #1M , swirl inward toward the center.

Place your flower(s) on the cupcake then make leaves using tip #352. I personally feel the stand up leaf looks best on these. When using this tip you always want to hold it like a birds beak! 


 And you're finished!
It's quite easy, yet so beautiful.


As you can see, I made a lot that day...


Until Next Time, Happy Baking! 

Wednesday, May 23, 2012

Elmo Cake

Today we are going to revisit the tracing concept I spoke about last time. My now one year old loves Elmo, so I wanted to make him an Elmo cake for his 1st birthday (last month). Rather than buying the character pan, that I probably won't use again, I transferred a drawing of Elmo's face onto a round 8" cake.


I haven't tried making my own cakes...yet. I wanted to try the Betty Crocker mix for this cake. I chose a plain cake and added almond flavoring to it. 


I use Bakers Joy to grease the pan that I bake in. After 10-15 minutes of taking the cake out of the oven, I flip it upside down and leave it there for at least 15 minutes. I feel that it flattens the dome that is on the top of the cake, so it's less cake that I have to cut off to make it level. 


For the frosting, I like to use a less sweet version of butter cream. I find the mixture of butter and vegetable shortening less sweet than the version of only vegetable shortening. 
The butter cream recipe that I am currently using is:

1/2 cup solid vegetable shortening
(Do not get buttered flavoring and add 1 teaspoon of water if using Crisco or it says no trans-fat)
1/2 cup non-salted butter or margarine
1 tsp. clear vanilla extract
4 cups of confectioners sugar (Dixi and Costco brands have worked best for me)
2 tbsps. milk 

Cream butter and shortening with electric mixer. Add vanilla. Gradually add sugar, one cup at a time. Beating well on medium speed. When all sugar has been mixed in, icing will appear dry. Add milk and beat at medium speed until light and fluffy. Keep icing covered with a damp cloth until ready to use. Keep in fridge when not in use in an airtight container. Yields around 3 cups. 

This recipe is from a 1989 Wilton Yearbook that my dad had from years back. 


When frosting your cake, you want to be sure you thin out your frosting. Being the recipe I use has butter in it, it will already be around medium consistency. I usually just add a tablespoon of water and feel it out. You do not want it runny though! Just thin enough where a spoon will fall to the side of the bowl if placed in the center. 
When icing your cake, you want to be sure your spatula only touches frosting. If it touches cake, you will have crumbs mixed in with your frosting and it's not pretty. 
I like to use this order when frosting: Frost the top - Frost the side - Pull in the extra frosting from the outer top sides into the middle of the cake to make a nice sharp edge.


Now take a printout or drawing of your preferred picture. Take some piping gel and color it the same color you want your drawing to be. For example, I did Elmo, he is red, so I used red piping gel. You want to make an outline of the drawing on the opposite side of the ink, as seen below.


The hardest part in this is making sure when you transfer this to your cake that you center your drawing.
Once you have the paper placed where you want it, piping gel side on the cake, brush over it lightly with a small dry paint brush. 
Once you slowly remove the paper off the cake, you will end up with an outline like this:


Using your butter cream, color a good portion of it red if you're doing Elmo. You want to color a little more than what you are going to use because if you run short, it will be difficult to get the same exact color. To get a deep red, you want to mix Red-Red and Christmas Red together if you're using the Wilton gel colors. Our Wilton instructor told us that the gel colors are better than the water based ones so you do not end up watering down the butter cream. 


I did small stars for everything other than the nose, somewhat like a character cake. I used tip #18. 
Black is difficult to make because it's so dark and you only need so much, so I just bought the tube. All you have to do is add the tip to the opening and the screw part of the coupler and you're ready to go!
For elmo's nose, I used tip #12, fill in the space then smooth out the lines.
Rather than doing stars for the pupils of his eyes, next time I may flatten it out. May look better?


I thought this style of sides was cute for a child's cake. First, using tip #3 to pipe vertical zigzag lines about a 1 in. apart along the side of the cake. Use tip #18 to pipe the zigzag boarder on the bottom. Then use tip #12 to pipe the bead top boarder. 


I also used the tip #12 to pipe the large circles around the cake for some dimension. 


Until Next Time, Happy Baking!

Monday, May 21, 2012

Cupcake Cake

So I started Wilton cake decorating classes at AC Moore and I'm loving it! I never knew how to do any of this, but I have learned so much from these classes and it's just once a week! Given, I have been practicing plenty. Any opportunity I get to bake a cake or decorate some cupcakes, I grab it! 

So with my newly found love for cupcakes, what better combo than cupcake and cake?? 

This is one of the coolest techniques I learned within the first month. Take any picture you want for your cake, print it out on a sheet of paper (or draw it) and trace the backside (not the ink side) with writing gel.

Once you have the picture in writing gel, flip the paper on to the top of the cake (writing gel side onto cake)

Brush over the paper with a paintbrush. Ever so carefully pull off and vwala! 

You have your outline which you just fill in with icing!


In my next posts, I'll try to give as many details as possible. Such as tip numbers and types of cakes and filling I use. This way if you want to try, you have the details! 

Until then, happy baking!